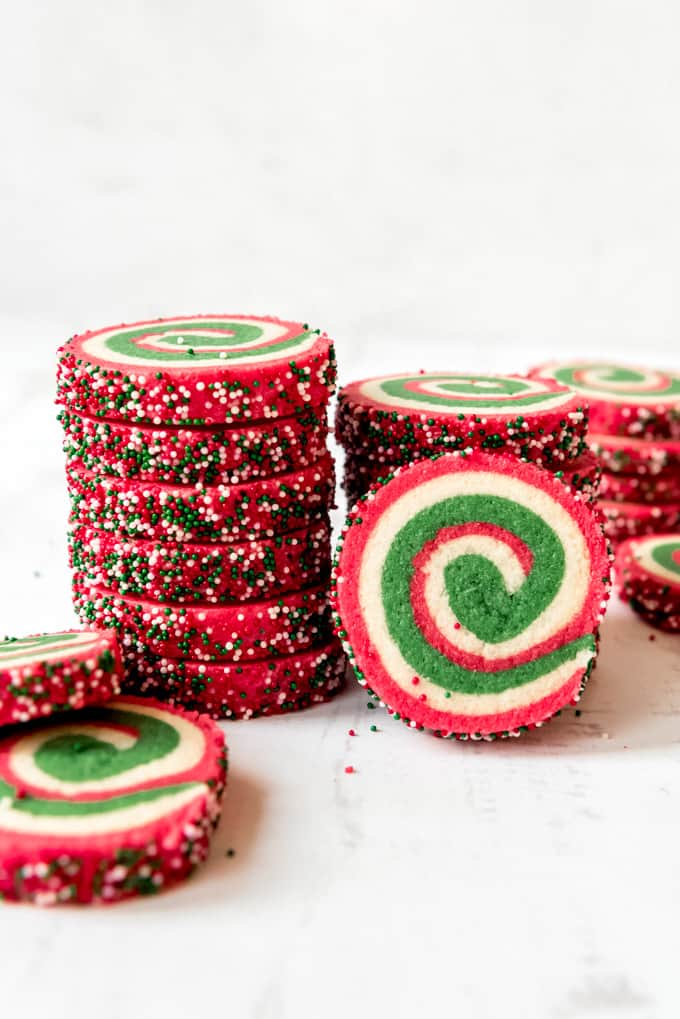
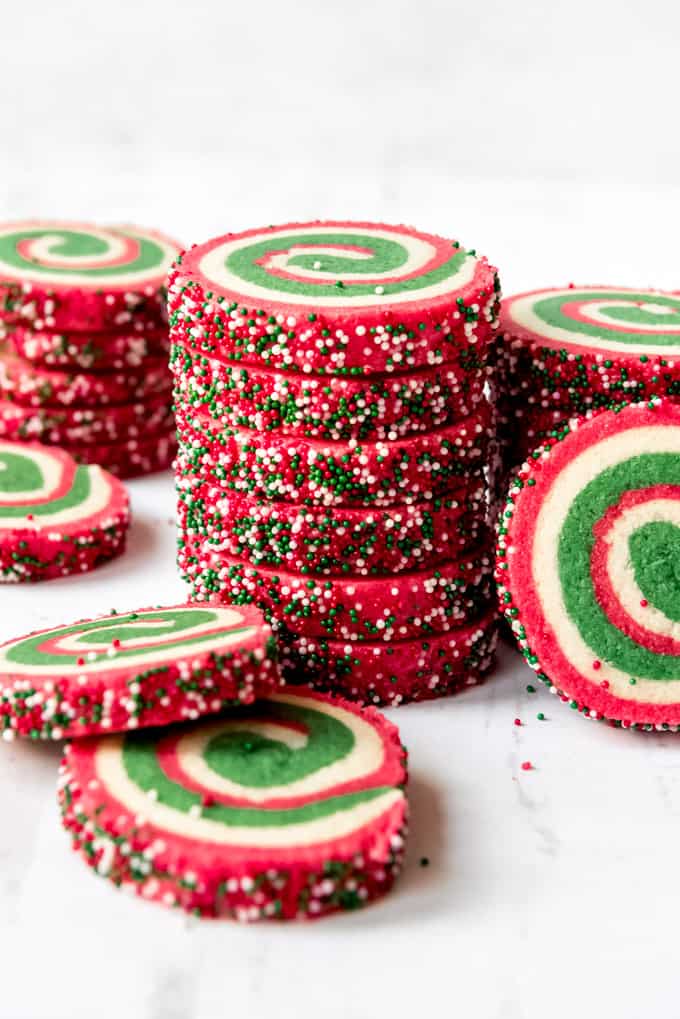
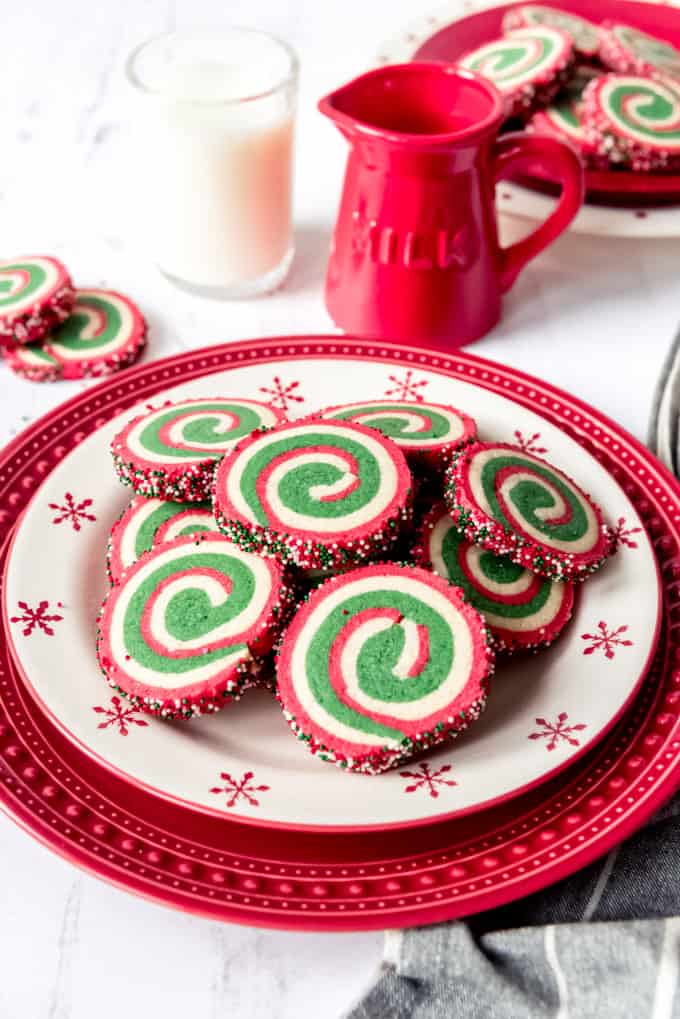
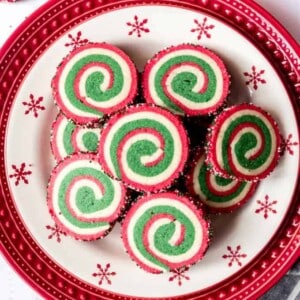
These delightfully festive Pinwheel Cookies will be the most talked about addition to any holiday cookie exchange. These slice & bake sugar cookies have mesmerizing swirls of color and are rolled in nonpareil sprinkles for a special crunch!
It’s Amy from House of Nash Eats again and I’m so excited to share these deceptively delicious cookies that are always a favorite during the holiday season!
They are perfect for rounding out a Christmas cookie plate, right along with some of our other holiday favorites like peanut butter blossoms, chocolate crinkle cookies, and Mexican wedding cookies!
Pinwheel cookies can be enjoyed any time of the year and can be colored with any color you like to match the season or occasion. But we think they are especially perfect at Christmas because they look just like something from the imagination of Dr. Seuss. I can just imagine these pinwheel cookies in a Who-ville bakery window display case!

What are slice and bake cookies?
I love slice and bake cookies for the holidays because you make the dough in advance and can leave it chilling in the fridge until you are ready to bake. Then you just remove the roll of cookie dough and slice off as many cookies as you like, rather than rolling and cutting them out like typical sugar cookies.
How to Make Pinwheel Cookies
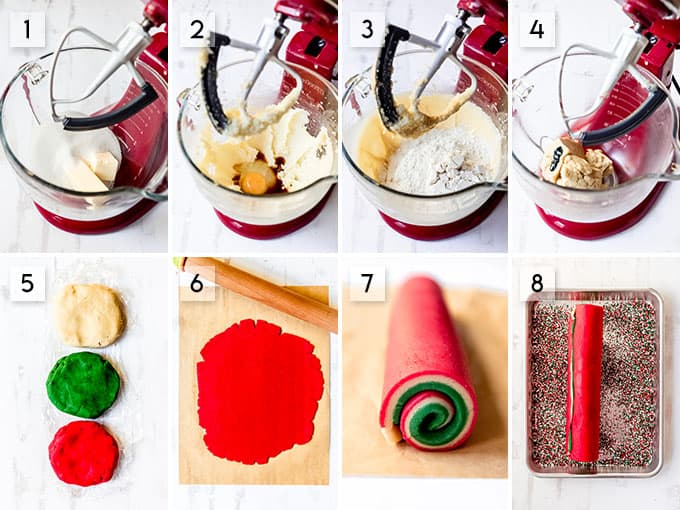
- Combine butter and sugars in a mixer and beat well until light and fluffy.
- Add in the eggs, vanilla, and any flavoring (if desired), scraping the bottom and sides of the bowl.
- Mix in the flour, baking powder, and salt.
- Divide the dough into three even sized balls. You could be really precise and weigh them to make sure you get even amounts, but I always just eyeball it.
- Return 1/3 of the dough to the mixing bowl and add a few drops of gel food coloring. I like gel food coloring best because it is more concentrated and you get better color with less of it than with liquid food coloring. Mix the food coloring into the dough, then repeat with another color. Red, green and white are obvious Christmas choices, but you could just divide the dough into two portions and do candy cane pinwheel cookies.
- Flatten each ball of dough into a disc and wrap it in plastic wrap. Chill in the freezer for 20 minutes or in the fridge for 1 hour.
- Roll out each disc of dough, one at a time, on a piece of parchment paper to create rectangles that are roughly the same size and shape. Stack the thin layers of dough on top of each other with white in the middle and red and green on the top and bottom. The easiest way to do this is by lifting the parchment paper and flipping it over, then peeling it off the dough and repeating with the next layer.
- Trim the long sides so that the edges are even. The shorter ends can be trimmed later after you roll the dough into a log.
- Carefully roll the dough into a nice, tight log, using the bottom piece of parchment paper to lift the dough and help you roll it to avoid cracks. Then wrap the dough in plastic wrap and chill in the fridge for at least 1-2 hours.
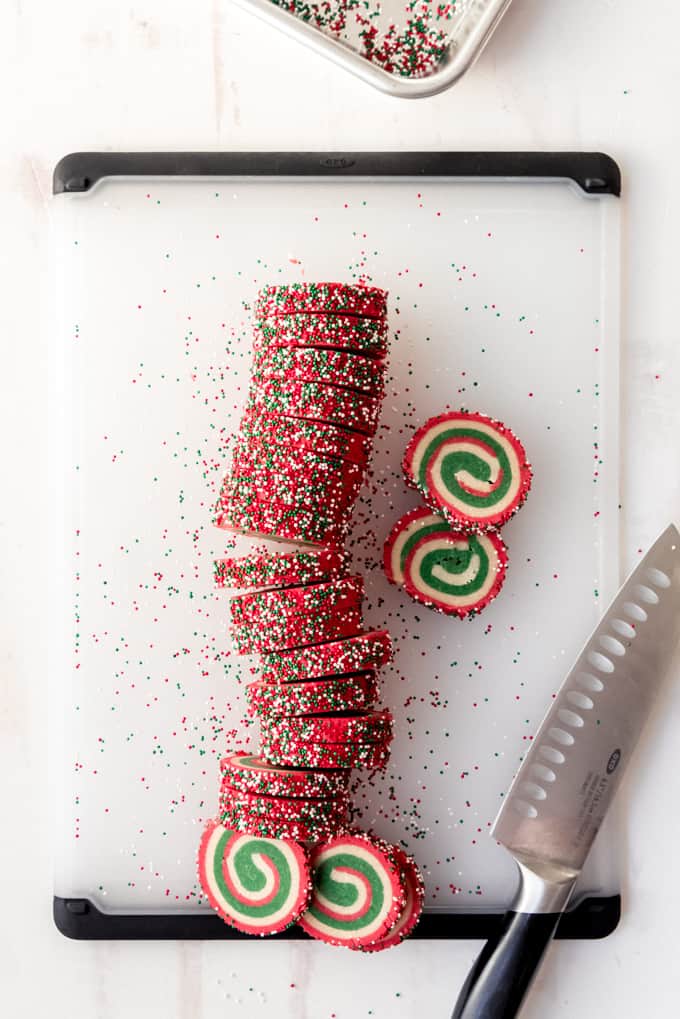
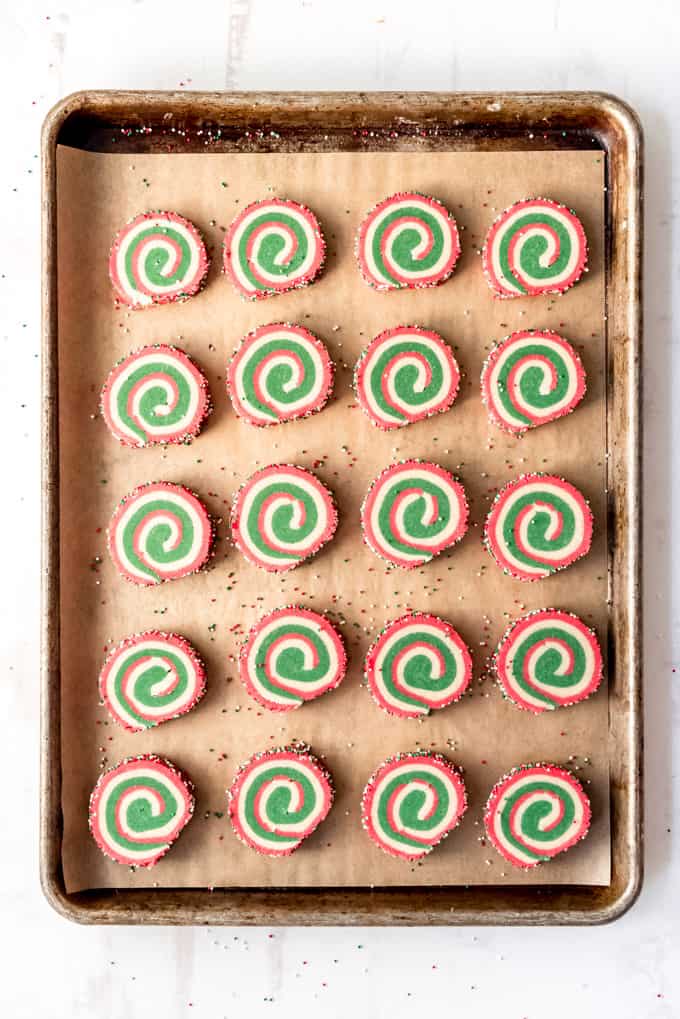
- Once the dough is chilled, you can slice and bake them as is, or roll in nonpareils on a baking sheet to coat the outside of each cookie. You really have to press the dough into the sprinkles to get them to stick and give good coverage, but because the dough is chilled well, it won’t cause your swirls to get misshapen. At this point, you can slice and bake the cookies, or wrap them up and store them in the fridge for up to 1 week to slice and bake as needed.
- When ready to bake your pinwheel cookies, preheat the oven to 350 degrees F. Line a baking sheet with parchment paper.
- Unwrap the roll of cookie dough and cut off the uneven ends. Then slice 1/4-inch cookies and space them 1-2 inches apart on the parchment paper. Bake for 10-12 minutes until set, then cool completely on a wire rack.
How to Store Pinwheel Cookies
Store baked pinwheel cookies in an airtight container on the counter for up to 1 week. They also freeze well for up to 3 months. Just let them thaw on the counter for a few hours before serving.
Pinwheel Cookie Flavor Variations
These cookies have a nice, light classic sugar cookie flavor that is buttery and sweet with a hint of vanilla as written. But you can use your favorite extracts to change things up. I’ve added 1/2 to 1 teaspoon of peppermint, anise, coconut, and rum extracts before with good results.
Or you could use fresh lemon zest and a tablespoon or two of lemon juice for lemon flavored pinwheel cookies.
~ Enjoy!
Pinwheel Cookies
Ingredients
- 3/4 cup salted butter, softened to room temperature
- 3/4 cup granulated sugar
- 3/4 cup powdered sugar
- 2 eggs
- 2 teaspoons vanilla extract
- 2 1/2 cups all-purpose flour
- 1/2 teaspoon baking powder
- 1/2 teaspoon salt
- Red & green gel food coloring
- Holiday colored nonpareils
- Optional: 1/2-1 teaspoon of additional flavoring extracts or lemon zest
Instructions
- Combine butter, granulated sugar, and powdered sugar in a mixer and beat well until light and fluffy.
- Add in the eggs, vanilla, and any flavoring (if desired), scraping the bottom and sides of the bowl.
- Mix in the flour, baking powder, and salt until combined. Divide the dough into three even sized balls.
- Return 1/3 of the dough to the mixing bowl and add a 5-10 drops of red gel food coloring, mixing well until the dough is evenly colored. Repeat with another 1/3 of the dough and the green food coloring.
- Flatten each ball of dough into a disc and wrap it in plastic wrap. Chill in the freezer for 20 minutes or in the fridge for 1 hour.
- Roll out each disc of dough, one at a time, on a piece of parchment paper to create rectangles that are roughly the same size and shape. Stack the thin layers of dough on top of each other with white in the middle and red and green on the top and bottom. Trim the long sides so that the edges are even. The shorter ends can be trimmed later after you roll the dough into a log.
- Carefully roll the dough into a nice, tight log, using the bottom piece of parchment paper to lift the dough and help you roll it to avoid cracks. Then wrap the dough in plastic wrap and chill in the fridge for at least 1-2 hours.
- Once the dough is chilled, roll in nonpareils on a baking sheet to coat the outside of each cookie. You really have to press the dough into the sprinkles to get them to stick and give good coverage. At this point, you can slice and bake the cookies, or wrap them up and store them in the fridge for up to 1 week to slice and bake as needed.
- When ready to bake your pinwheel cookies, preheat the oven to 350 degrees F. Line a baking sheet with parchment paper.
- Unwrap the roll of cookie dough and cut off the uneven ends. Then slice into 1/4-inch cookies using a sharp knife and space them 1-2 inches apart on the parchment paper.
- Bake for 10-12 minutes until set, then cool completely on a wire rack.
Notes
Nutrition
Nutrition information is automatically calculated, so should only be used as an approximation.


Great recipe! I wasn’t sure how they would turn out because I used gluten free flour and ingredients. I was so happy with the result! Can’t wait for my grandkids to see them, Thank you! Next time I will try different flavoring.
I made these, and even after chilling in the freezer for 30, and fridge for over an hour they are soooo sticky!! Any thoughts or tips?
Wonderful recipe. The pinwheel cookies came out beautiful! I included 1/2 tsp almond exract. The flavor of these cookies is great! Dough was extremely easy to work with. Thank you so much for posting this.
I made these tonight and when I took the first bite I literally said out loud “damn”.
They are so good! I actually wasn’t expecting them to turn out so yummy and perfect looking. Dough was super easy to work with. I flavoured mine with vanilla extract, butter vanilla emulsion and almond extract. Wow! Definitely going to keep this recipe. Thank you!.
These cookies are super colorful and also surprisingly easy to prepare. They are a big hit with the kiddies. 🙂
These cookies are super adorable and perfect for the holiday season!
These pinwheel cookies were a hit at our holiday party. Great recipe!
Nicole, these are beautiful! We made these for my mom’s birthday, in all her favorite colors! Thanks for a great recipe!